

Transform Your Bathroom with Stunning Tile Designs: A Step-by-Step Guide to Achieving the Perfect Look
Are you tired of your outdated bathroom and looking for a way to transform it into a stunning space? Look no further! In this step-by-step guide, we will show you how to achieve the perfect look by using captivating tile designs. Whether you’re going for a sleek and modern aesthetic or a rustic and cozy vibe, the right tiles can completely change the atmosphere of your bathroom.
With our expert tips and guidance, you’ll learn everything you need to know to choose the right tile materials, pattern, and colour that suits your taste and complements your existing décor. From elegant porcelain to unique mosaic designs, we will explore the endless possibilities for creating a bathroom that radiates your personal style.
The benefits of updating your bathroom with stunning tile designs go beyond aesthetics. Not only can it increase the value of your home, but it can also enhance your daily experience by creating a soothing and rejuvenating atmosphere. So, get ready to embark on this exciting journey of transforming your bathroom into a luxurious retreat with our comprehensive step-by-step guide.
Benefits of using tile in bathroom renovations
When it comes to renovating your bathroom, using tiles can provide numerous benefits. Firstly, tiles are known for their durability and longevity, making them an excellent investment for your bathroom. Unlike other materials, such as wallpaper or paint, tiles can withstand moisture and humidity, ensuring they remain in pristine condition for years to come.
In addition to their durability, tiles offer a wide range of design options. With a variety of colours, patterns, and materials to choose from, you can create a bathroom that reflects your personal style and preferences. From sleek and minimalist designs to bold and vibrant patterns, the possibilities are endless.
Furthermore, tiles are easy to clean and maintain, making them a practical choice for bathrooms. With their smooth and non-porous surface, tiles are resistant to stains and can be easily wiped clean. This not only saves you time and effort but also ensures that your bathroom remains hygienic and free from mold or mildew.
In summary, using tiles in your bathroom renovations provides durability, design flexibility, and easy maintenance, making it an ideal choice for transforming your space. Now, let’s explore the popular tile materials and styles that can elevate the aesthetic of your bathroom.
Popular tile materials and styles for bathroom design
When it comes to choosing the right tile materials for your bathroom, there are several options to consider. Each material has its own unique characteristics and benefits, allowing you to create a bathroom that suits both your style and practical needs.
- Porcelain: Porcelain tiles are a popular choice for bathrooms due to their durability and versatility. They are resistant to water, stains, and scratches, making them an excellent option for high-traffic areas such as bathrooms. Porcelain tiles are available in a wide range of colours, patterns, and finishes, allowing you to achieve any desired look, from sleek and modern to classic and timeless.
- Ceramic: Ceramic tiles are another common choice for bathroom design. Like porcelain, ceramic tiles are moisture-resistant and easy to clean. They are available in various sizes, shapes, and colours, making them suitable for any design aesthetic. Ceramic tiles can mimic the appearance of natural materials, such as wood or stone, without the maintenance and cost associated with those materials.
- Natural stone: Natural stone tiles, such as marble, granite, or travertine, add a touch of luxury and elegance to any bathroom. These tiles are known for their unique veining and textures, creating a visually stunning focal point. However, it’s important to note that natural stone requires regular sealing and maintenance to preserve its beauty and protect it from water damage.
- Mosaic: Mosaic tiles are small tiles arranged in a pattern or design, often used as a decorative element in bathrooms. They can be made from various materials, such as glass, porcelain, or natural stone. Mosaic tiles offer endless design possibilities, allowing you to create intricate patterns, borders, or even feature walls in your bathroom.
Now that you have an overview of the popular tile materials for bathroom design, let’s move on to the next step: planning your bathroom tile project.
Planning your bathroom tile project
Before diving into your bathroom tile project, it’s essential to plan and prepare to ensure a smooth and successful renovation. Here are some key steps to consider:
- Set your budget: Determine how much you are willing to spend on your bathroom renovation, including the cost of materials, labor, and any other additional expenses. This will help you prioritize your choices and make informed decisions throughout the project.
- Define your style: Consider the overall style and theme you want to achieve in your bathroom. Are you looking for a modern, minimalist design or a more traditional, rustic feel? Browse through magazines, websites, and social media platforms for inspiration and create a mood board to visualize your ideas.
- Measure your space: Accurate measurements are crucial to ensure you purchase the right amount of tiles and avoid unnecessary waste or shortages. Measure the length and width of your walls and floors, taking into account any obstacles such as windows, doors, or fixtures.
- Create a layout plan: Sketch a layout plan of your bathroom, indicating where you want to install tiles. Consider the placement of fixtures, such as the sink, bathtub, or shower, and how the tiles will complement these elements. This will help you determine the quantity and arrangement of tiles needed for each area.
- Consider practicality: Think about the functionality and practicality of your tile choices. For example, larger tiles can create a sense of spaciousness, while smaller tiles may require more grout, which can be harder to clean. Additionally, consider the slip resistance of the tiles, especially for wet areas such as the shower or bathtub.
Once you have completed the planning phase, it’s time to prepare your bathroom for tile installation. Let’s move on to the next section to learn more.
Preparing the bathroom for tile installation
Preparing your bathroom for tile installation is a crucial step to ensure a smooth and successful renovation process. Proper preparation will not only help the tiles adhere better but also prevent any future issues such as cracking or shifting.
Here are the key steps to prepare your bathroom for tile installation:
- Clear the space: Remove all furniture, fixtures, and accessories from the bathroom to create an empty and clutter-free workspace. This will give you ample room to work and avoid any accidental damage to your belongings.
- Demolition: If you are replacing existing tiles, you will need to remove them before installing new ones. Use a hammer and chisel to carefully remove the old tiles, starting from the edges and working your way towards the center. Be cautious not to damage the underlying structure or plumbing.
- Inspect and repair: Inspect the walls and floors for any damage or imperfections. Fill any cracks, holes, or uneven surfaces with a suitable filler or patching compound. Ensure that the surfaces are clean, dry, and smooth before proceeding with the tile installation.
- Apply a waterproofing membrane: To protect your bathroom from water damage, it’s recommended to apply a waterproofing membrane. This will create a barrier between the tiles and the underlying structure, preventing moisture from seeping through and causing potential issues such as mold or rot.
- Plan the tile layout: Using your layout plan as a guide, mark the starting point for your tiles on the walls and floors. This will help you visualize the final result and ensure that the tiles are installed in a straight and symmetrical manner.
Now that your bathroom is prepared for tile installation, let’s move on to the exciting part – the step-by-step guide to installing bathroom tiles.
Step-by-step guide to installing bathroom tiles
Before you dive into the world of tile design, it’s important to prepare your bathroom for the installation process. Start by removing any existing tiles, wallpaper, or paint from the walls and floors. Make sure the surfaces are clean, dry, and free from any debris. This will ensure that the tiles adhere properly and result in a seamless finish.
Next, inspect the walls and floors for any cracks or imperfections. Fill in any gaps and level the surfaces with a suitable filler or patching compound. This step is crucial to ensure that the tiles lay flat and create a professional-looking installation.
Once the preparation is complete, it’s time to measure the area you plan to tile. Accurate measurements are essential for determining the quantity of tiles you’ll need and avoiding any wastage. Use a tape measure to measure the height and width of the walls and the length and width of the floors. Take note of any irregularities or obstacles that may require special attention during the installation process.
Now that your bathroom is prepped and ready, let’s move on to the exciting part – installing the tiles!
Choosing the right grout and sealant for your bathroom tile
Installing bathroom tiles can seem daunting, but with the right tools and techniques, it can be a rewarding DIY project. Follow these step-by-step instructions to achieve a professional-looking tile installation:
- Gather your tools: Before you begin, make sure you have all the necessary tools and materials on hand. These may include a tile cutter, trowel, notched trowel, grout float, spacers, level, sponge, adhesive, and of course, the tiles themselves. Having everything ready will streamline the installation process and prevent any delays.
- Start with a dry layout: Before applying adhesive, lay out the tiles in your desired pattern to get a visual idea of how they will look on the walls or floors. This dry layout will allow you to make any adjustments or modifications before committing to the installation. It’s also a good time to double-check your measurements and ensure everything fits as planned.
- Apply the adhesive: Using a notched trowel, apply a layer of adhesive to a small section of the wall or floor. Start at the center and work your way outwards, spreading the adhesive evenly. Make sure to follow the manufacturer’s instructions for the appropriate adhesive type and drying time.
- Set the tiles: Carefully place the tiles onto the adhesive, pressing them firmly to ensure proper adhesion. Use tile spacers to maintain consistent gaps between the tiles for grouting. Continue this process, working in small sections at a time, until all the tiles are in place.
- Cut and trim tiles: At some point, you may need to cut or trim tiles to fit around corners, edges, or fixtures. Use a tile cutter or wet saw to make precise cuts. Remember to wear protective eyewear and follow the manufacturer’s instructions for safe and accurate cutting.
- Allow the adhesive to dry: Once all the tiles are in place, allow the adhesive to dry according to the manufacturer’s instructions. This drying time can vary depending on the adhesive type and environmental conditions. Avoid walking on the tiles or applying any pressure until the adhesive is fully cured.
- Apply grout: After the adhesive has dried, it’s time to fill the gaps between the tiles with grout. Mix the grout according to the manufacturer’s instructions and apply it using a grout float, pressing it into the gaps at a 45-degree angle. Remove any excess grout from the tile surfaces using a damp sponge or cloth.
- Clean and seal the tiles: Once the grout has dried, clean the tiles with a mild detergent and water solution to remove any grout haze or residue. Rinse thoroughly and allow the tiles to dry completely. Finally, apply a tile sealant to protect the grout from stains and moisture, ensuring the longevity of your beautiful tile installation.
Following these steps will help you achieve a professional-looking tile installation that will transform your bathroom into a stunning space. Now let’s move on to the next crucial step in the process – choosing the right grout and sealant.
Maintaining and cleaning bathroom tiles for long-lasting beauty
Grout plays a vital role in both the appearance and functionality of your bathroom tiles. It not only fills the gaps between the tiles but also provides stability and prevents moisture from seeping into the walls or floors. When choosing grout for your bathroom, consider the following factors:
- Colour: Grout colour can significantly impact the overall look of your tile design. You can opt for a matching colour to create a seamless blend or choose a contrasting colour to make the tiles stand out. Take into account the colour of the tiles, the style of your bathroom, and your personal preference.
- Type: There are various types of grout available, including sanded, unsanded, epoxy, and acrylic. Sanded grout is suitable for wider gaps, while un-sanded grout is ideal for narrow gaps. Epoxy grout is highly durable and resistant to stains and moisture, making it perfect for high-moisture areas like bathrooms. Acrylic grout is easy to work with and offers good adhesion.
- Sealant: Applying a tile sealant is essential to protect the grout from stains, moisture, and mold growth. Sealants create a protective barrier that repels water and prevents dirt and grime from penetrating the grout. Choose a high-quality sealant that is specifically formulated for bathroom tiles and follow the manufacturer’s instructions for application.
By selecting the right grout colour, type, and sealant, you can enhance the overall appearance and longevity of your bathroom tiles. Now, let’s move on to the next important aspect – maintaining and cleaning your bathroom tiles for long-lasting beauty.
Inspiring bathroom tile design ideas and trends
Proper maintenance and regular cleaning are essential for preserving the beauty and longevity of your bathroom tiles. Follow these simple tips to keep your tiles looking brand new:
- Regular cleaning: Regularly sweep or vacuum the floors and wipe down the walls to remove dust and dirt. Use a mild detergent and warm water solution to clean the tiles, avoiding abrasive cleaners that may damage the surface. Rinse thoroughly and dry the tiles to prevent water spots or streaks.
- Grout maintenance: Keep the grout clean and free from stains by using a grout cleaner or a mixture of baking soda and water. Apply the cleaner to the grout lines, scrub gently with a grout brush, and rinse thoroughly. Consider resealing the grout every few years to maintain its integrity and prevent moisture penetration.
- Preventive measures: To minimize the risk of damage, place mats or rugs in high-traffic areas and near the shower or bathtub. Promptly wipe up any spills or splashes to prevent staining. Avoid using abrasive cleaners or tools that may scratch or damage the tiles.
By following these maintenance and cleaning practices, you can ensure that your bathroom tiles remain beautiful and functional for years to come. Now, let’s dive into the world of inspiring bathroom tile design ideas and trends.
Conclusion: Achieving the perfect look with stunning tile designs
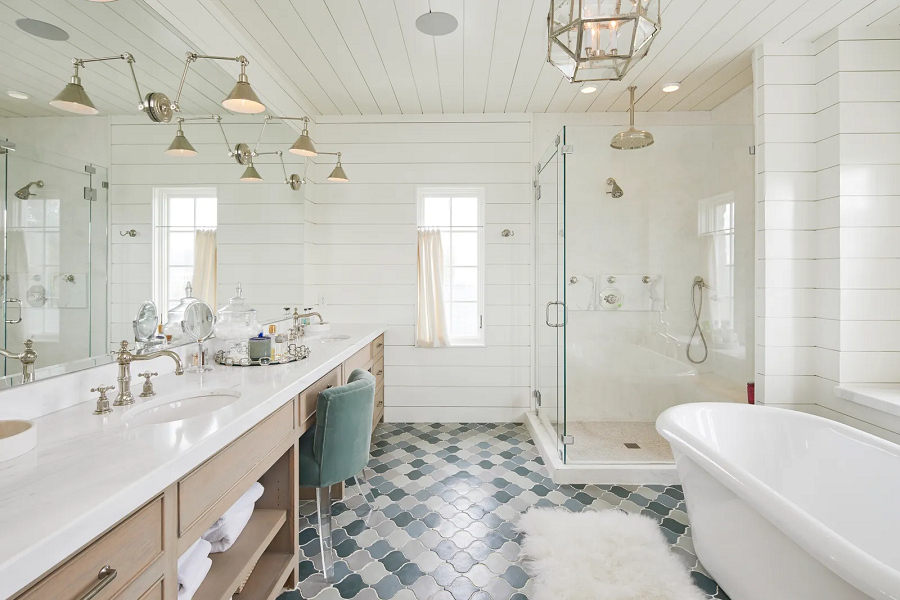
When it comes to bathroom tile design, the possibilities are endless. Here are some inspiring ideas and trends to help you create a stunning bathroom that reflects your personal style:
- Subway tiles: Subway tiles are a timeless choice that adds a classic and elegant touch to any bathroom. Opt for white or neutral-coloured subway tiles for a clean and minimalist look, or choose bold-coloured tiles for a more vibrant and contemporary feel.
- Mosaic tiles: Mosaic tiles offer endless design possibilities with their intricate patterns and vibrant colours. Use mosaic tiles as an accent wall or create a mosaic mural for a truly unique and artistic touch.
- Marble tiles: Marble tiles exude luxury and sophistication, creating a spa-like atmosphere in your bathroom. Choose from various marble patterns and colours to achieve a timeless and elegant look.
- Patterned tiles: Patterned tiles are a great way to add personality and visual interest to your bathroom. Whether it’s geometric patterns, floral designs, or Moroccan-inspired motifs, patterned tiles can transform your bathroom into a stylish and eye-catching space.
- Wood-look tiles: If you love the warmth and texture of wood but want the durability of tiles, wood-look tiles are the perfect choice. These tiles mimic the natural look of wood while offering water resistance and easy maintenance.
Remember, the key to a successful tile design is to choose a style that resonates with your personal taste and complements your existing bathroom décor. Don’t be afraid to mix and match different tile types and patterns to create a unique and personalised look.
Please link to https://www.handymangroup.co.nz/services/kitchen-bathroom-services
